hey mama - Çağır Beni
cınematographıc anımated musıc clıp
Çağır Beni , Meetıng of Dıgıtal Arts wıth Musıc
IDEAS AND CONTENT PRODUCTION
Idea Generatıon: Quest
Çağır Beni is a Cinematographic Digital Art Animation Music Clip Work of Hey Mama's Musical Work of the same name. While the song talks about a double love story in its own words, it is fed by the feelings of deep depression, longing and deficiency that the individual experiences after this love. In fact, the text of "Çağır Beni" includes many sentences beyond the double love phenomenon, the personal depression experienced by individuals after their relationships, their position in social status and the social effects of self-perception.
"Çağır Beni" is a musical piece with its own side stories and universe. When I first encountered the story, I wanted to create a Digital Art universe that processes all these semi-layered stories. In this universe, the individual's commitment to bilateral relations under the positive image he shows to the outside and to himself in the mirror stage is a very sharp issue. Also, love is an issue that comes from existence. A person's lack of love is a feeling that comes from deep layers as much as love. The first step of a person towards awareness is to get away from himself and his world. In Çağır Beni, the lack of love and love makes us realize the reality of a social structure that has become de-identified and deformed. It is inevitable to create a collection of works from the snapshots of this universe. I want to take photos from this universe, as in the streets of Istanbul where you can explore. The first leg of the series of works that bring together the life cycles of Hey Mama's 3 amazing women and these texts is the Animation Music Clip of Çağır Beni.

Screenplay: Çağır Beni to Adventure,
The story of Çağır Beni is related to Hey Mama's women, their life stories and their dreams. Imagination and adventure should be the main actions of our script. The song handles personal contrasts in real life very well. That's why the animation music clip needs to contain an alternative perception of reality. Our journey, which starts with the daily life routines of our heroes in the scenario, turns into a bigger adventure than they imagined.
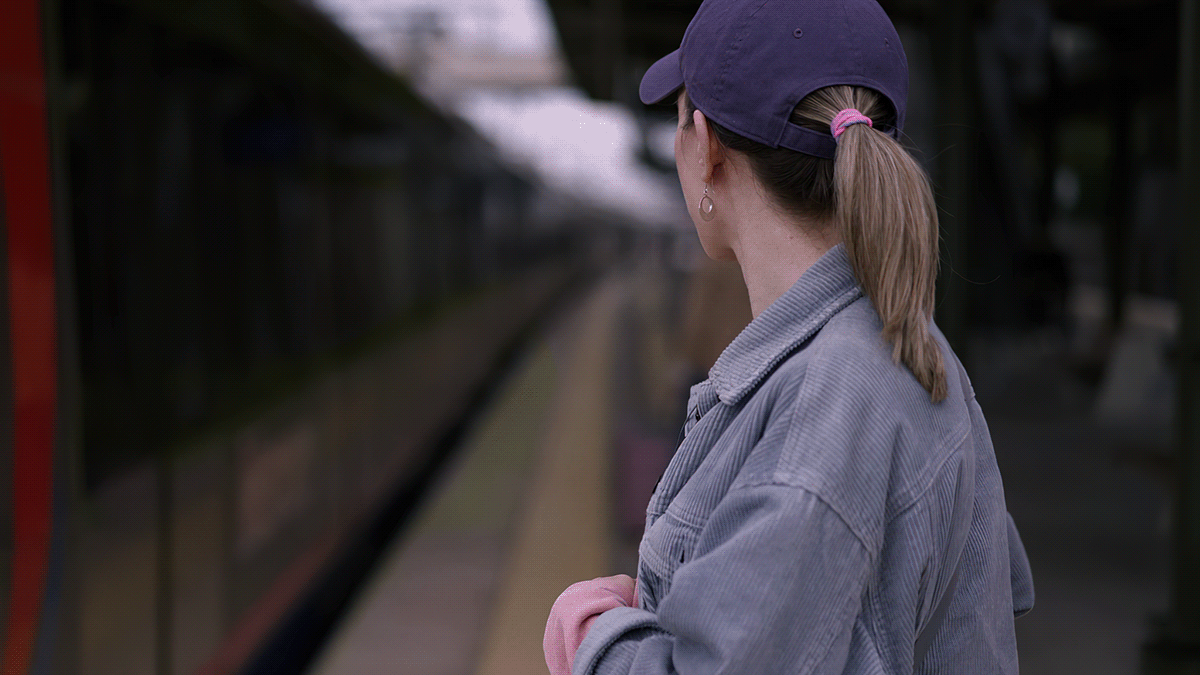
Girls who leave their homes and set out on the road, fall into a dream on the subway and wake up in a surreal new universe. Like everything that develops and changes, social structures are also moving towards de-identification or identity confusion. The reality in Hey Mama's dreams actually reflects the effort of people who want to produce and be creative, to stay colorful within these social structures. The Çağır Beni universe, which we started to experience in the Metro, turns into an adventure where the girls move towards their goals, run, sometimes stumble and fall, but still do not give up believing and trying, in a monotonous social crowd.
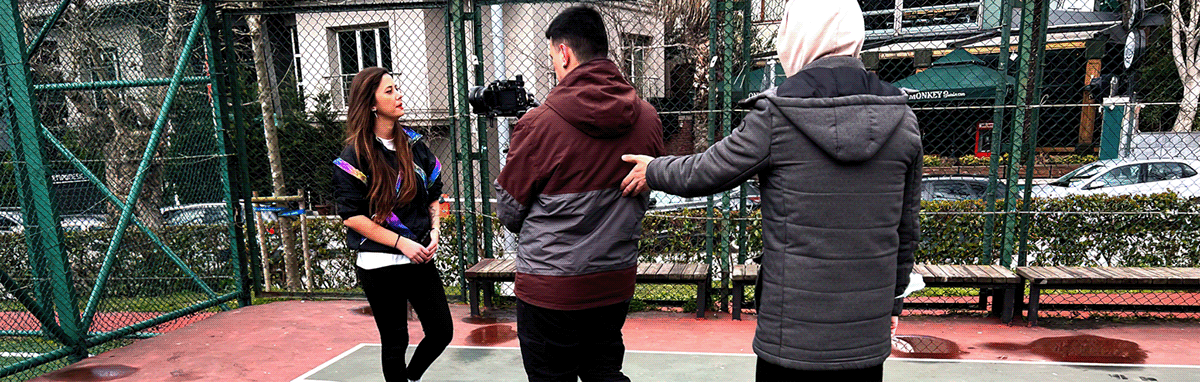
We see all the visuals of the work depicting the real lives of Hey Mama, as well as from the framing of the talented name Yakar Anıl Canbolat, whom I entrusted as the Digital Art Image director of our works in the GDDART team. We have been sharing the animation music clip idea with Yakar from the very beginning, and he makes incredible contributions to relate his ideas and production items to Digital Arts. In the Digital Art muscle, he performs a selfless work with the magnificent talents of GDDART, which also includes Yakar. Combining Digital Arts with the framing of a Cinematographer also offers us many interdisciplinary narrative opportunities.
When we share this work and flow we planned with Hey Mama, we write down the points and details we developed together. First you need the project file. All details need to be in a format that can be read and perceived in order to direct more than 30 artists, 6 different departments and teammates and make them imagine the digital artwork I have in mind. All the scenes and then all the plans are drawn one by one. At this point, we are working with two great geniuses who started drawing before holding a pencil. Our Storyboard and Moodboard team have drawn 106 independent cinematographic animated films, scene-by-scene, and directed imagination and scenarios to our animation artists in the past two years. We detail the second-by-second flow of the story that we draw the Storyboard and Concept Designs for. Here, a large content team writes down all the details in millimeters, we list all the models, characters, animations and all the finer details that may be needed. All listed items are filed with their references and details, and are first forwarded to the Character and Modeling departments.
THE CHARACTER DESIGN AND ANIMATING PROCESS
So who will wear what now?
As the Çağır Beni Digital Art universe expands, it offers us the sweet details and possibilities of storytelling with its own side stories. In order to give the contrast between the characters and all the stories, we had to work in detail on the character designs and art direction. All characters except our heroes are free of colors, stuck in cycles and atrophied by new social norms. On the contrary, our heroes are as colorful, lively and dynamic as possible. Detailed and complex, down to the movements and folds of her clothes.

Superheroes sew their own clothes,
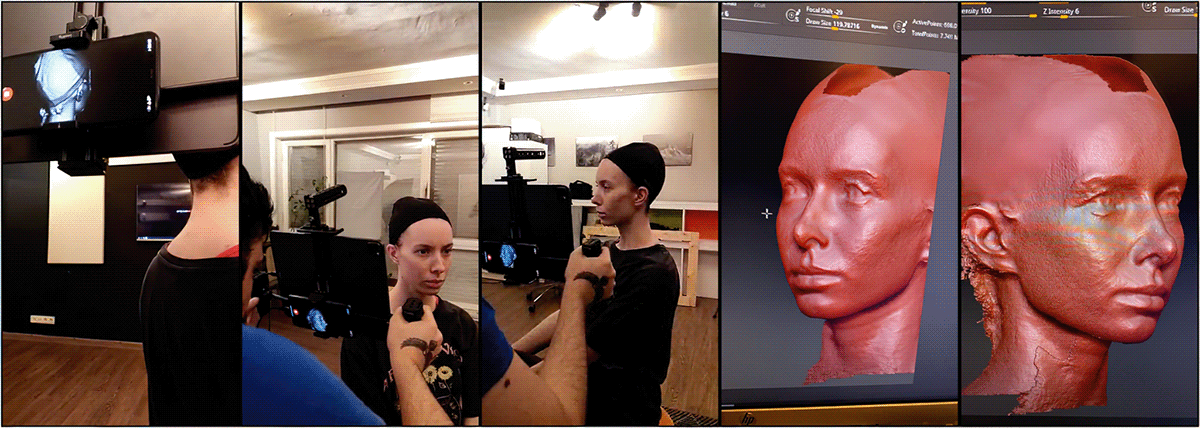
In order to associate Hey Mama's three women with the story, we need to include their real silhouettes in the visual world. We start the production journey by creating 3D Digital Twins of our first characters. We have established a Digital Asset Scanning Studio where we can scan with lidar sensors. First of all, we scan the girls in detail with Lidar Sensors in the Studio and process the result manually.
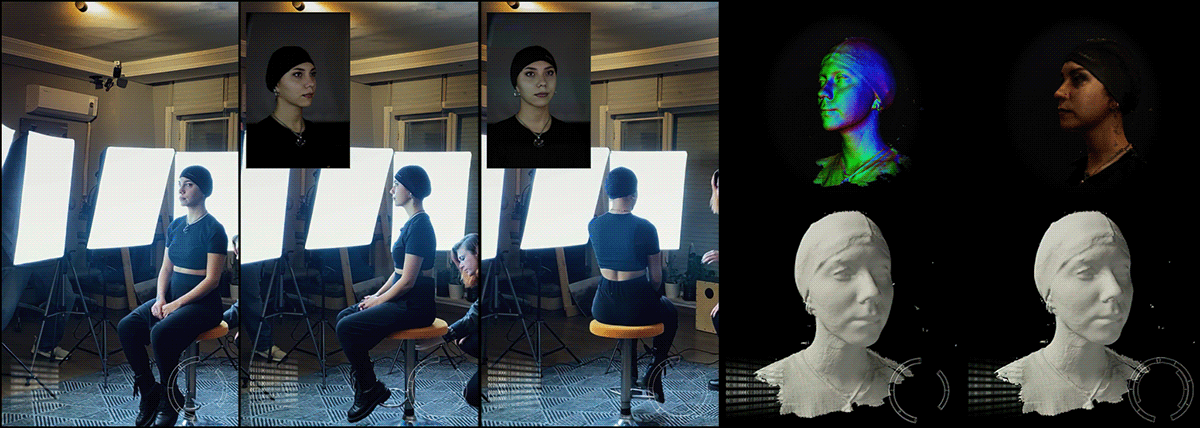
We need to combine the raw 3D scan results created for our heroes with their tissues. We have created a Photo shooting area. With a shadowless light array, we manually project the textures that we photographed at 5 degrees in high detail onto the 3D raw models, parallel to their angles, and we obtain the final texture. In the final, we need to make the texture as realistic as possible because the Lidar sensors we have can scan up to 0.5 mm detail and many of these textures lose detail with smoothing processes. To achieve this, we may even have to break its realism. Because the most realistic renders are those that contain some deliberate flaws. We repaint the girls' facial tissues with tissue samples using 3D Scan data packages and add exaggerations where necessary. Now our 3D digital twins are ready. Now we need to be able to make them ready for animation.

Usually, we have a production line that rotates between the Unreal Engine and Houdini as a team. Considering all possibilities, and it is very common to exhaust all possibilities in Digital Art productions, our Digital Twins should be assets compatible with game studios and contain details, while remaining ready for animation while doing them. For this, we can benefit from the Reallusion family software. Among the characters that are ready to work in IClone and Character Creator programs, we first approach the characters closest to our characters in terms of physical features. Thanks to the Headshot plugin, we bring the faces and expressions closer to our characters. We reflect and match our high-detailed models, which are obtained by scanning with the help of ZBrush, with various Warp techniques. But there is one more problem. The final model obtained will either have a high surface number and deviate from the skeleton or have lost detail. That's why we embed our details in our texture visuals and prepare our characters with craftsmanship in the ZBrush and in addition to the textures, Substance Painter software.
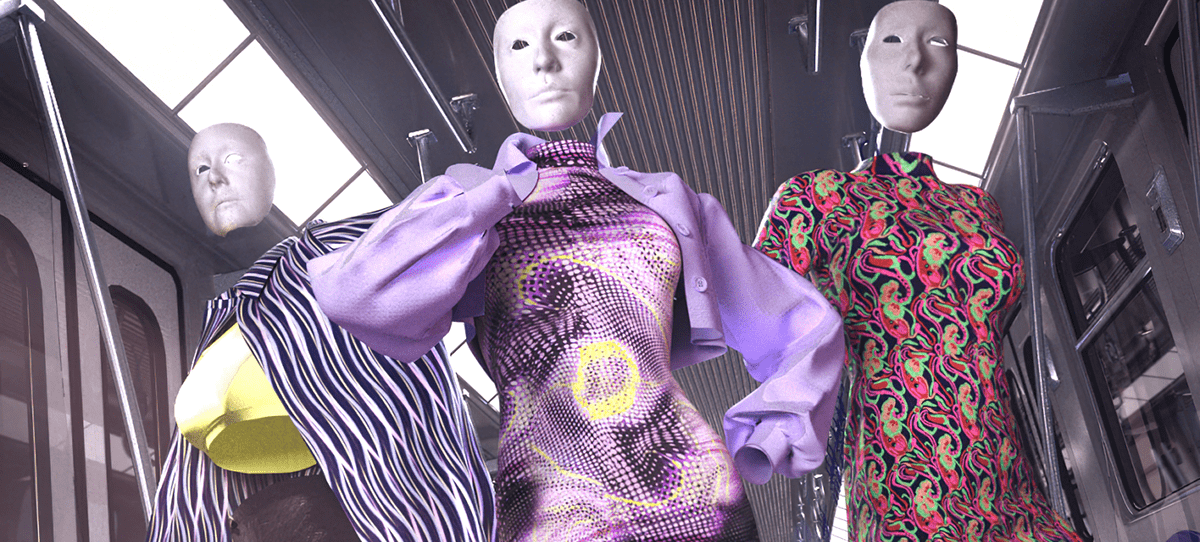
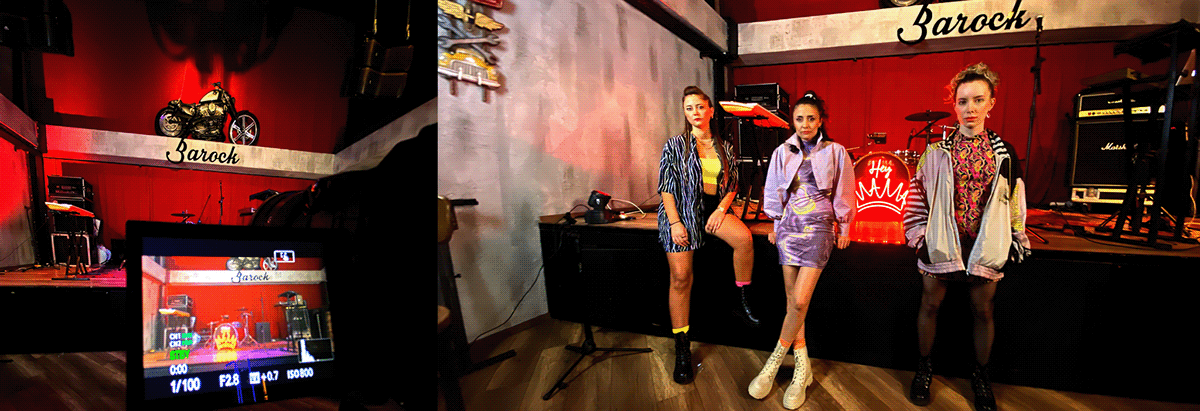
The digital twins of our characters are ready. Now we need to design clothes for these 3D models. The script of the animation music clip ends with a stage performance at Barock, when our girls' dream of Hey Mama meets the audience for the first time. They should wear the clothes they wear here in their dream worlds. After all, this is their dream. We have a department in which we have been continuing our research and development for a long time.
Our Digital Art Tailors,

Our team of Fashion & Design and Textile based artists have been developing their own know-how on Digitizing Textile products and creating new Digital Textile Assets for a long time.
We first take the clothes used in the last scene of the animation music clip to our photography studio. We modeled the clothes, whose images we transferred to digital, in 3D with one-to-one textile production plans. Models processed in detail according to fabric and raw material types were also painted with photographed textures and combined with 3D scanned material data. The fold details photographed for the folds and real tissue deformations of the clothes are processed as elevation maps.
Now Characters and their clothes are ready. These beings need to come to life in the story.
Actors of alternate reality, Motion Capture technology for Animation Music Clip
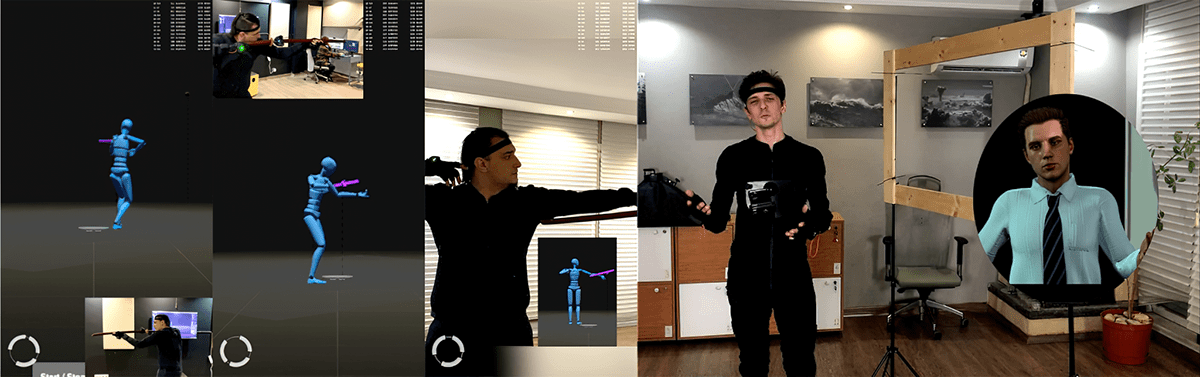

Our heroes need to bear traces of themselves in their actions, as in their assets, and their actions should represent them. Because our work does not just portray a story, it portrays our heroes in another reality. Everything from their facial expressions to their body movements should represent our girls with their characteristic features. Both for its compatibility and support for Unreal Engine and Iclone software, and for the cleaning possibilities it offers with its own main program, Rocoko is the perfect fit for this project. For this project, we used our own motion capture studio, which provides 25 square meters of 100 percent accuracy in an area of 6 meters by 6 meters. Our studio is a faraday cage whose walls are surrounded by electromagnetic paints, and almost all of the equipment inside is made of wood and plastic materials. In our studio, where we maximize field verification with Lidar scanners in all four corners, we have receivers that enable us to capture the movements of the equipment used by the actors, theatrical equipment, and many possibilities from treadmills to basic tracks to capture various movements. Unlike the Motion capture sequences we were used to before, the characters have a singing action. The mimics that give the song the emotion on the stage should be very sharp so that the narration can pass to the audience. In particular, the characters have a lot of close-ups, and in some of these shots, the characters are face to face with the audience. We need a muscle system simulation to record mimics in detail. For such a detailed motion recording, more than 150 blendshape poses are studied for Digital Twins. We rig the poses we are working with and make them ready for the face registration system of rococo.
Everythıng ıs ready now.

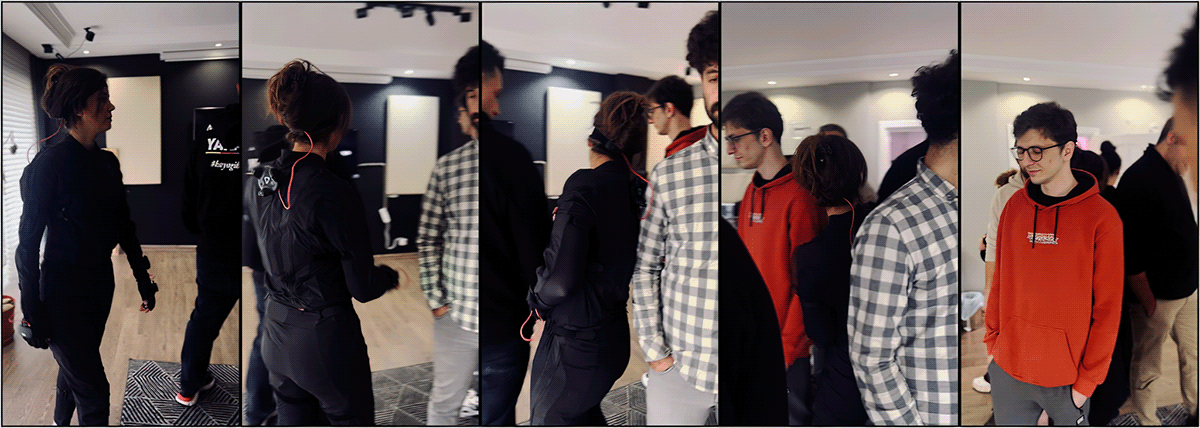
We made the measurements of the girls one by one in the studio, dressed them in their Rococo and created their ready-to-record characters. We subjected the girls to metal isolation a day before and purified them with water. In order for the girls to follow the action, we worked on a pose-to-pose animation flow video consisting of the storyboard drawings of the movie. In the follow-up of this video, which is directed to the girls, we recorded and detailed all the details that appear in the animation sequences. Almost all of the animated scenes took place in a subway sequence. First of all, we edited the exact same example of the subway sequence that we created the 3D model of in our Motion Capture studio. We created all the surfaces that we can contact, from environmental factors and crowded extras, as a track. We almost got our recordings in the final stream. We already wanted to not interfere with the character records as much as possible.
In real life, we asked Ecem to act the way she is uncomfortable with someone who sits next to her on the subway and can squeeze her.
We wanted them to carry whatever expression they would carry when standing up.
We wanted it with their bodies, exactly how they would show self-confidence while walking along with the song.
Facial expressions were one of the most important issues for us. We re-recorded the faces and mimics as a separate layer and later combined them in the entire flow in the required proportions. At some moments, the mimics could be insufficient, as I said, the best rendering was the one that fed the deliberate mistakes. That's why we combined two recordings with exaggerated gestures while singing, according to our needs in the flow.
All these character animation recordings and subsequent edits were packaged as a result of the second-by-second processing and deep work of a large team of mocap operators and character animation artists.

ENVIRONMENTAL DESIGN AND MODELING
There are several reasons why the area where the characters dream is the subway. First of all, I wanted our characters to have a vehicle on their journey to support their journey to their dream worlds and then to their dreams. Metro is an important figure for the journey in the chaotic city life, and it is the common phenomenon that Hey Mama has been constantly intersecting in their own stories since its early days. We had to model a surreal and original subway car that would remind of Turkish Metro vehicles. The wagon we modeled had to be extendable and cyclical and had large long windows to remind of a dream so that we could add a surreal flavor to the scene with god rails.

Our fIrst stop Is the Metro,
We poured the Metro wagons that we digitized with lidar sensors into Point Cloud assets. With the help of Photoshop, we poured the textures that we had collected with tons of photos into texture maps and made designs on them. We created a longer, spacious and minimal metro model by accepting the main Metro model we created as Point Cloud as a skeleton as possible. The cut points of the model we created should have been extended cyclically. Therefore, we poured the model segments that we grouped into the final model in a procedural function in Houdini software. Procedural modeling would be of great use, especially for later animating the subway car. We preferred as much glass, epoxy and transparent materials as possible in the materials of the Metro model so that we could increase the light transmittance in the stage. It is necessary to add tiny elements that will support the story and models that will complement the side stories. First of all, we started with instrument models. We have placed violins, cello and their varieties that will occasionally be found in the crowd. Also, some posts would give us pleasure. That's why we have surprises that very careful eyes can see.
We are being held captive of the new Social communication, and actually the biggest action of the animation music clip is the music lovers who can escape from this captivity and achieve their dreams, Hey Mama! We had to put in a lot of details to explain how many captive characters, from their headphones to their phones, were hypnotized by the light of the screens.

In addition, all these details had to be as still and circular as possible, like the characters other than our heroes.
Our dreams should have touched the sky. The subway was supposed to fly in the sky among the clouds. That's why the whole movie needed a natural camera shake and more shake because the Metro didn't go on the ground. We have processed 3 different turbulence values with each other so that these oscillations have a more random pattern and look realistic.
The clothes of the characters were the production that we worked on animation mechanics the most throughout the whole movie. Physics flows of clothes change a lot according to their textures and materials. Obviously, simulating was much more painstaking and challenging for us. We simulated the data we received from the Rococo Motion capture studio in Marvelous Designer and sometimes in Houdini. I think the multi-layered and intertwined structures of the clothes were the most challenging aspect of this process. But we have a lot of experience in this field from the past and as a result, we have reached a simulation output that is incredibly enjoyable to watch.
CINEMATOGRAPHY, ANIMATION AND SIMULATIONS

Space DeformatIons for Alternate RealItIes
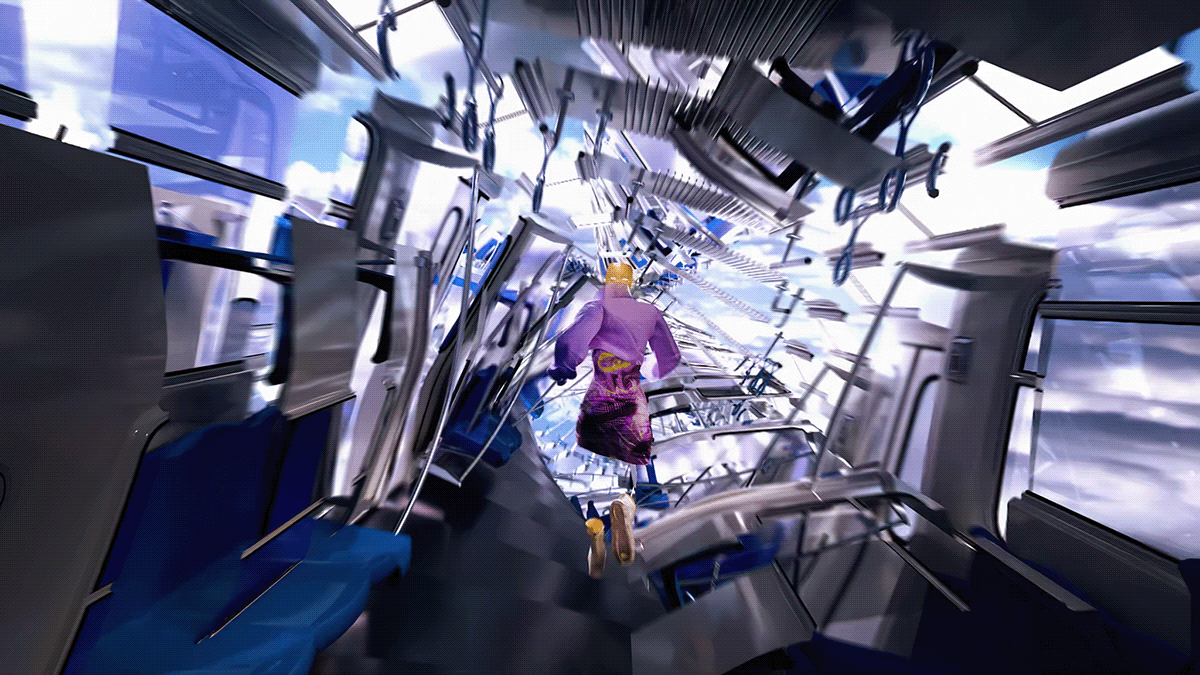
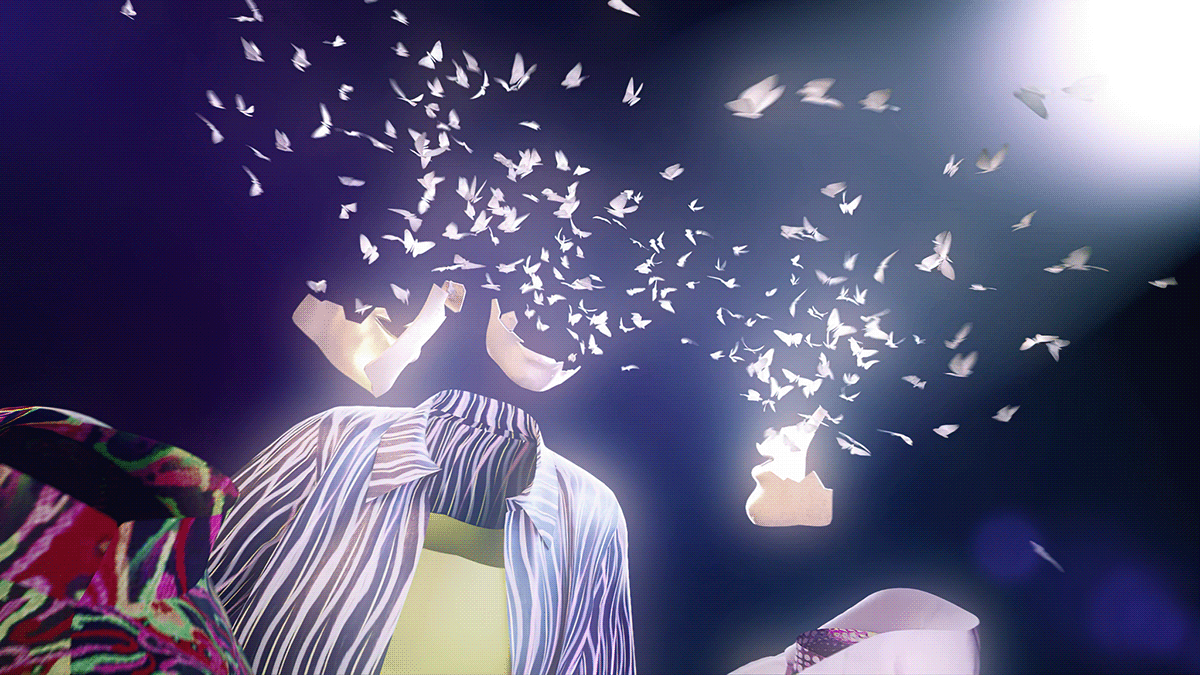
In fact, the process of character animations, which we normally add after modeling and compositions, was a bit reversed in this project. With the rough determination of our Metro area, our first stage continued with the animation of the main characters, and then the environment and asset production. But in the Story, the adventure our heroes were in became more and more difficult, the place and environment they were in was resisting them and transforming. Just like many environmental factors they encounter while making music or dreaming in their own life cycle. For this, the Procedural Working discipline that I mentioned earlier worked very well. The subway had to stretch after a point, the target the hero was running had to escape from it. The grouped models in the procedural system provided the solution for this. At some point, our characters crossed a threshold in their adventures and added an incredible sense of reality to themselves. In order to illustrate this, I wanted to break the perception of size, one of the main pillars of the perception of reality. Metro transforms into a kaleidoscopic form, the character separates from the ground independent of space and time, and while looking at all this with great admiration, he finds himself in a great void. These animation loads are very high for a multi-group and given model, but let me offer you a convenience, Houdini Mops. This plugin packs your root models in a very practical way and makes it very easy to work on your animations.
I would like to open the project files to all young digital artist candidates who want to examine and experience the project files publicly on my website www.badqode.com. I recommend that you package it there and review the reassembly scheme.
Mask, more than just an Icon
After the deformed and disappearing subway scene, our characters begin to experience their inner confrontation and deformation in the space they fell into. Here, while the Mask is actually our character's Super-ego, they begin to deform with their alternative egos. Eventually, their masks transform and they disappear. While it is a scene that gives the subtext and the story, and the following the words very well, there is a very frustrating problem that can be encountered on the technical side. While you want to simulate the dismembered mask models in the voronoi diagram, the masks already have animations. To prevent this, a very small VEExpression and a few nodes worked. I will post them on the site along with the files.
Let me Introduce you, the CInematographer of DIGItal Art
Once the models and animations of the characters and surrounding assets were placed on the stage, we have almost set the stage where the film will be shot. Now, there is the Digital Art & Cinematography. No matter how well you do animations, if your camera and cinematographic touches are not good, your dramatology will always be weak. Here, I would like to talk to you again about Yakar.
In the past 2 years, we have produced exactly 106 cinematographic animated films, and this has given us an incredible experience in storytelling. In this process, I had some dreams to provide this unique production accumulation and one of them was to create the concept of Digital Arts Cinematography. The root of this job description was actually, as I mentioned above, to carry the flow of cinema to Digital Arts and to develop cinematography, perhaps one of the most important elements of storytelling. For this, we went through a training and then a production process for 2 years. Yakar is a Photography based Video Artist with a production and cinema base. Cinematography is a strong name for storytelling, I trust his framing. Yakar received a training on 3D animation production techniques with the team at GDDART studios for about 1 year. Actually, the purpose here was that I wanted him to see the possibilities and impossibilities according to the video production disciplines. He learned many aspects from Unreal outputs being unsuitable for Color to the disadvantages he experienced in the Compositing stages. Or, on the contrary, the incredible advantages Houdini and Redshift give on the way to production. Those interested in 3D Animation techniques can estimate the contribution of AOV layers in these productions. When I presented this offer to Yakar, the first sentence I said was "We have unlimited money and equipment, Yakar. How would you like to shoot it in front of the script?” it happened.
DIGItal Arts wIth a CInematographer's Frame
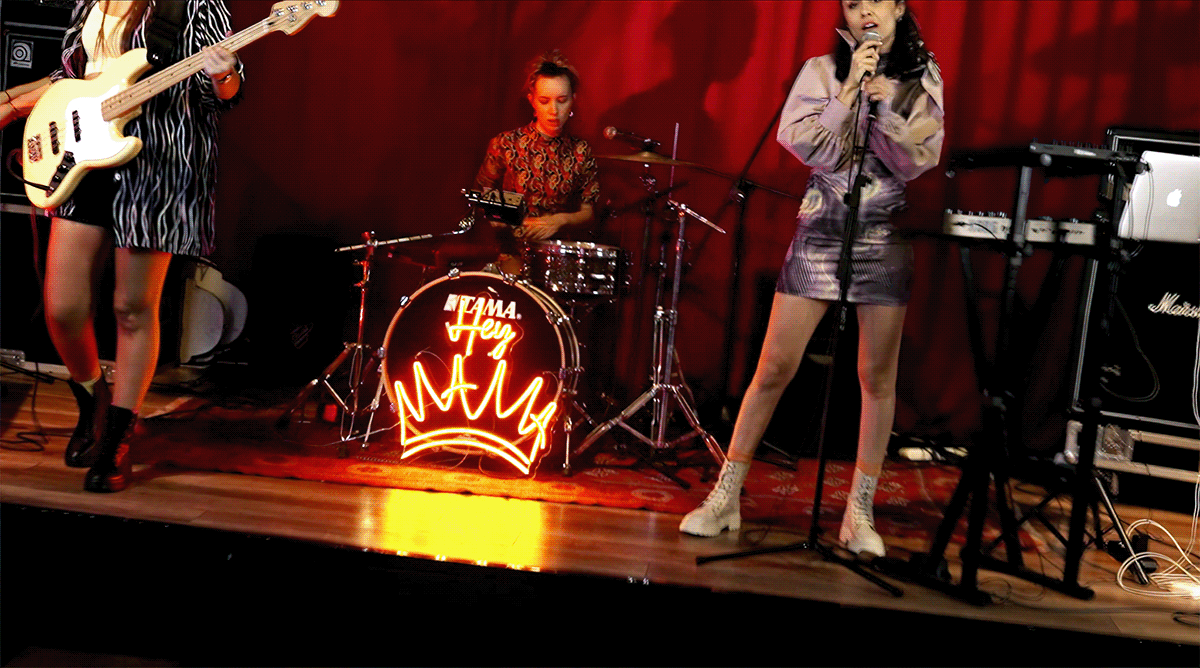
Our entire story actually concludes on Stage Barock, where Hey Mama's dreams meet the audience for the first time. Our heroes, who come out of the world of dreams, meet the audience with a fast and dynamic entrance at Barock Maslak. With dynamic plans, Actual Camera usage, Jumpcut a setup, Vertex camera movements and stage performance details, Hey Mama presents the audience with an enjoyable and energetic performance that they have been accustomed to for years, this time with their first Single.

Developing angles for the transitions of two disciplines in the finale of the subway transition and Mask scenes, creating character-oriented wide compositions in a jump cut fiction in the daily routines of our girls, and especially the details in color and composition schemes fed the contrast between the imagination and real worlds, giving the audience a continuous dynamism.

ÇAĞIR BENİ UNIVERSE WITH DIGITAL ARTS

In the World of DıgItal Art & NFT as a SIngle MusIc DIgItal Artworks CollectIon
Çağır Beni contains many character details and side stories. I want to describe this universe in its entirety. The Çağır Beni Animation Music Clip was one of the first published works of this universe. At the moment, we are preparing a collection that deals with the details of this universe and the side characters that remain in sight. In the near future, you will see works that tell these characters and stories in NFT markets for a few seasons. I took a lot of photos from this universe that I wanted to process our reactions to social decay and especially to bilateral relations.
Knowledge is Sacred, Wants to be Liberated

I would like to index and present to humanity many details about the production phase of Çağır Beni in every breath we find, as here. We are preparing to publish a construction phase documentation in the coming days. In addition, we are about to end the production of a podcast series that was designed with more details and a sweet conversation.
We value the sanctity and liberation of knowledge.
We are planning to publish training videos about these production techniques and adventure at the first opportunity in the Qode Academy structure that we have established under this sentence.
Stay tuned,
badqode.
badqode.
Credits
Digital Arts: Gökhan Doğan
Digital Director of Photography : Yakar Anıl Canbolat
DOP Asistant : Arda Ulukaya
Music & Lyrics : Hey Mama
Sound Design & Arrangement : Ekin Cengizkan
Mix & Mastering : Arıkan Sırakaya
Asistant : Yana Dornea
Scenario : Gökhan Doğan, Yakar Anıl Canbolat , Hey Mama
Content Development : Buse Ferruhpur
Content Asistant : Cem Koka , Mevlüt Karabulut
Mo-Cap Studios : GDDART - Gökhan Doğan
Mo-Cap Artist : İbrahim Babacan , Anılkan Çolakoğlu
Lidar Studios : GDDART - Gökhan Doğan
3D Character Design : İbrahim Babacan
3D Cloth Design : Dilara Kaya
3D Modelling : Aybar Ural
Color : Emrah Tekin
Storyboard & Moodboard Artist : Deniz Karakoyunlu , Görkem Tükenmez
Special Thanks,
Ali Ata Kavame
Barock Maslak
Kürşat Kara