SteamPunk styled USB mass storage device: 16GB
A few weeks ago, a friend of mine whom I've known for 12 years, turned 20, and to mark this momentus occasion, I decided to design and build him a SteamPunk styled USB Drive.
Drawing inspiration from the artists behind the Bioshock video game franchise, this USB Stick oozes SteamPunk, right from the viewing porthole, to the intricate clockwork detailing on the front panel.
Below is a stage-by-stage manufacturing sequence of the entire project from the first cut, right up to the final packaging:
Below is a stage-by-stage manufacturing sequence of the entire project from the first cut, right up to the final packaging:


Planning the project in secret was no easy task, as I spend a lot of time around the guy, so unfortunately there are no well-presented design pages, as all of the work was done in the small notebook that you can see on the table to avoid discovery!

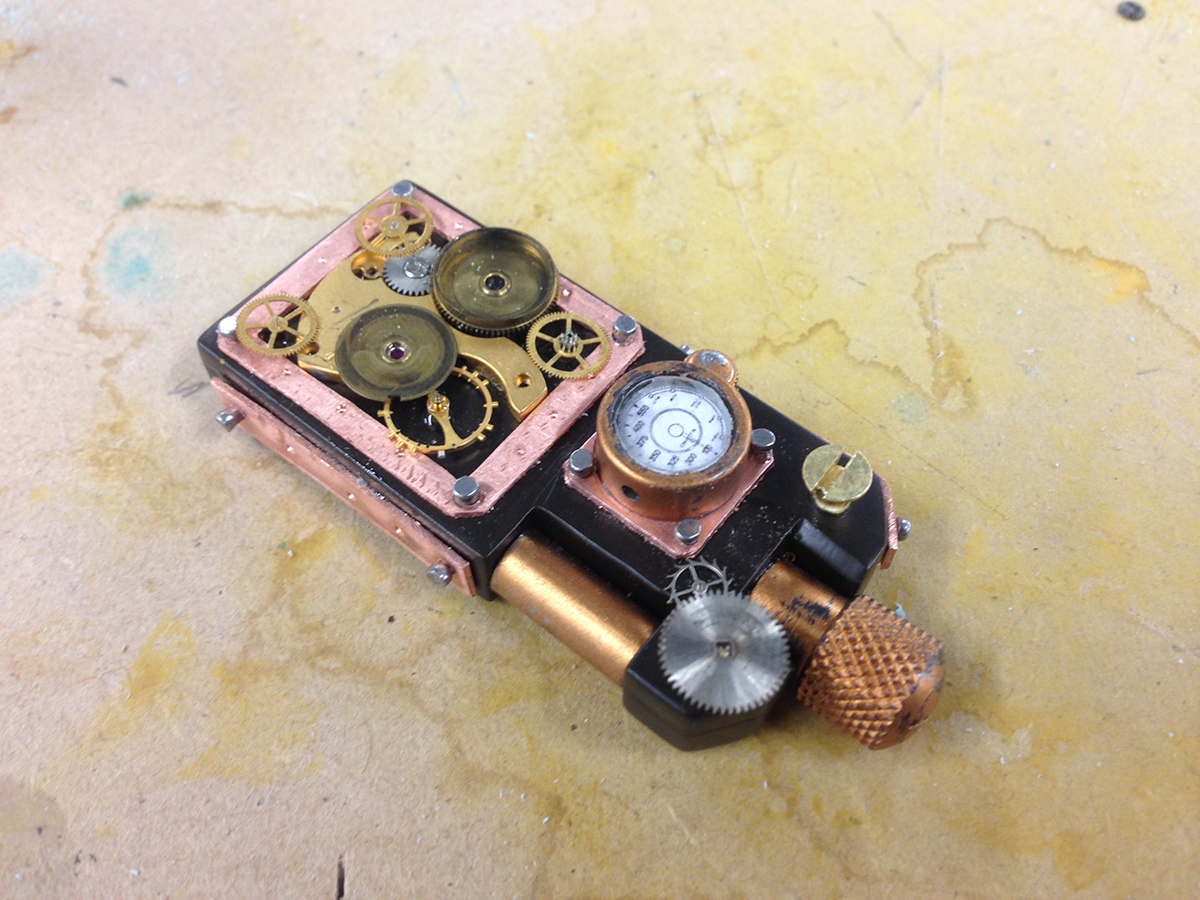
The body of the drive was cut from 5mm MDF and shaped by hand after having been backed with 2mm HDP plastic to provide a thin, and stable mounting surface.

The back corners were chamfered to break up the clunky square shape of the body, and a little spacer was added to the USB plug opening to provide a solid base to glue the drive electronics into.

Here you can see just how little of the space inside the drive was actually dedicated to the USB electronics - I found it to be one of the defining natures of the SteamPunk style; that objects appear larger and more clunky than necessary.
Furthermore, the additional material provided me with a solid base on which to mount the other components.
Furthermore, the additional material provided me with a solid base on which to mount the other components.

After disassembling an old, broken micrometer, I used the micro-adjustment ratchet to add a little dial on the back that will produce a faint 'click' when turned.
This is one of my favourite features, as it literally feels like you're busy winding up the USB drive!
This is one of my favourite features, as it literally feels like you're busy winding up the USB drive!

Here you can see the small little black steam-guage being fashioned, as well as an initial layout test for the clockwork components.
The guage was turned on the engineering lathe from a piece of steel, before being sprayed with a protective coating to prevent oxidation of the surface. The guage face was cut by hand and filed from a piece of clear perspex, and a small image of the readout was glued onto the back, inside face.
All of the copper components were cut from 2mm copper plating, before being heated, forged and annealed to reduce their thickness and give them a beaten, worn look.
Furthermore, the cold working process contributed to a lusterous petina-style finish on the surface that began to emerge after a few days exposure to the good old wet, cold British air!

Testing the clockwork alignment again, and making the guage mounting plates.

Here you can see that the guage was sprayed with an enamel based brass coloured paint. The surface was them rubbed with 1000 grit wet & dry paper in order to make it appear more weathered.

The ratchet was also sprayed in the same way, and the body of the drive was first coated with 3 layers of car body primer before being sprayed with a very dark automotive brown layer.
The use of car paint is a great trick that I was taught by a modelling specialist in order to produce an extremely hard, durable paint coat that can make a piece of MDF appear as if it were made of a hard plastic, or a delicate, oven-fired ceramic.
The use of car paint is a great trick that I was taught by a modelling specialist in order to produce an extremely hard, durable paint coat that can make a piece of MDF appear as if it were made of a hard plastic, or a delicate, oven-fired ceramic.

The clockwork components were bought from the friendly chap down the road at the watch repair store. The watches were broken beyond repair, and even though I did try and fix one of them (they were very nice watches and I had a vision of me re-building one of these classic time pieces!), eventually I gave up and carefully disassembled them to get to all of the little gears an cogs hidden within.
Those little red pieces that you can see in the gear mountings are actually a semi-precious stone called garnet. This stone was used in old watched to reduce friction among the wind-up components, and they add a nice classy touch to the USB drive.
The use of precious materials is often seen in SteamPunk designs, as if the creators of the quirky machines were decorating the mechanical inventions, and I thought that this was something that would certainly have to be translated into my design.
The use of precious materials is often seen in SteamPunk designs, as if the creators of the quirky machines were decorating the mechanical inventions, and I thought that this was something that would certainly have to be translated into my design.

These side panels were forged in much the same way as the previous front-facing, and those small dimples that can be seen were created using a centre-punch to simulate rivets.
The small pin you see lying on the table is how most of the copper components were fixed onto the body. I love the way that SteamPunk machines always appear to be held together with chunky screws and hefty nails and once they were hammered in, they produced a stunning aesthetic that really adds to the drive as a whole.
The small pin you see lying on the table is how most of the copper components were fixed onto the body. I love the way that SteamPunk machines always appear to be held together with chunky screws and hefty nails and once they were hammered in, they produced a stunning aesthetic that really adds to the drive as a whole.

Adding some screws for visual effect and working into the guage mounting plate a little more.

Here you can see the first stage of final assembly.
The panels were tacked onto the body, and the guage was glued into place using expoxy adhesive. A small hole was also drilled into the guage body to fascilitare the pipe work that you saw in the first images.
The panels were tacked onto the body, and the guage was glued into place using expoxy adhesive. A small hole was also drilled into the guage body to fascilitare the pipe work that you saw in the first images.

Mounting the clockwork components and adding some extra gears here and there for an added aesthetic boost.

It was at this stage that I began to prep the back plate of the drive.
It was also formed out of HDP, and sprayed in the same way as the rest of the body. The copper plates were made in the same way, however unfortunately I had begun to run out of internal space within the drive, and as such the nails in the back plate were simply cut down and glued into place.
The small porthole was drilled into the back plate using the pillar drill, and the casing was again turned on the engineering lathe. The face was made by hand in the same way as the guage on the front, and the whole thing was glued into place using epoxy adhesive.

I love the way that you can see the USB components within the drive through the porthole - it really adds an extra layer of authenticity to this design!
Unfortunately, the USB drive I used did not have a status light, so I had to solder a small LED across the power supply rails of the USB connector in order to produce an eery red glow through the porthole once the drive was plugged in!
Unfortunately, the USB drive I used did not have a status light, so I had to solder a small LED across the power supply rails of the USB connector in order to produce an eery red glow through the porthole once the drive was plugged in!

Here you see the pipe work being completed. Each one was made from 2mm diameter aluminium wire, bent by hand using a pair of pliers. This was actually extremely tricky, and even though in the picture they appear to be skew, before they were glued in place, I bent them into the correct shape.

After putting the whole thing together, and fixing the USB electronics in place, I built a little crate out of balsa wood to present the drive nicely, and in a fashion that I thought would emulate the SteamPunk style flawlessly.

Thanks for having taken the time to look over this project of mine! I had loads of fun designing and making it, and my mate absolutely loved it!
Currently I am busy designing a second iteration that will actually have working, moving compoinents, so stay tuned..
Thanks!
Currently I am busy designing a second iteration that will actually have working, moving compoinents, so stay tuned..
Thanks!


