
Rendering Series
Render Settings & Optimization
Render Settings & Optimization
Version 2.0, Updated Feb 2023 using Octane 2023.1.2 and Cinema 4D 2024.2 with help from Marcus Spranger & Roeland Schoukens @Otoy (thank you!!)
About This Guide
This guide used to be just about the Path Tracing kernel, but now it’s more of a holistic look into all of the kernels. It focuses on general workflow strategies, deep dives into the important ones, and explains how the settings work together to optimize the rendering process.
If you haven’t read through the Scene Optimization guide, it’s worth doing prior to reading further in this one. Setting the scene up properly means avoiding issues later, and then you can use what you learn in this guide to tweak the settings to speed up the final renders and make them look better rather than use them as band-aids to fix issues that could have been avoided in the first place.
This guide was meant for Octane in all its incarnations, but was developed using the Cinema 4D plugin, so some of the defaults and names might be a little different in Standalone and other DCCs. The concepts are valid regardless, and can even be applied to other render engines.
Changes from 1.0
Full rewrite and all new images.
PDF
This guide is also available in PDF form here.
Intro
Optimizing a render is a two-part process. The first part involves making sure all the textures and polygons fit nicely into VRAM, and cleaning up the geometry so there are no errors, and adjusting lights and material properties so there isn’t any undue stress on the GPU. All of this is covered in the Scene Optimization guide.
Once the scene is in good shape, we can focus our efforts on the render settings to pick a kernel, limit rays, implement some helper tools, decide how many passes are needed, and even cheat a little with post to get our final frames out as quickly as possible.
Workflow Overview
Step 1. Pick a kernel based on what kind of materials, lighting, and look we’re going for.
Step 2. Set initial settings: Low samples, high depths, high GI clamp, tone mapping, GPU-specific tweaks like parallel samples. Use AI/Analytic lights if it makes sense.
Step 3. Play with depths to get them as low as possible without impacting the look of the scene, lower GI clamp in PT or PMC if caustics are in the way and unneeded, or move to Photon Tracing if caustics are important.
Step 4. Adjust scene-specific settings like Coherent Ratio, Ray Epsilon, Caustic Blur, and/or Hot Pixel Removal if there are specific issues with that scene that can be fixed by these.
Step 5. Dial in Sampling. Try Adaptive Sampling to optimize which parts of the scene Octane focuses on to speed up the render times. Use Denoiser so Max Samples can be kept as low as possible.
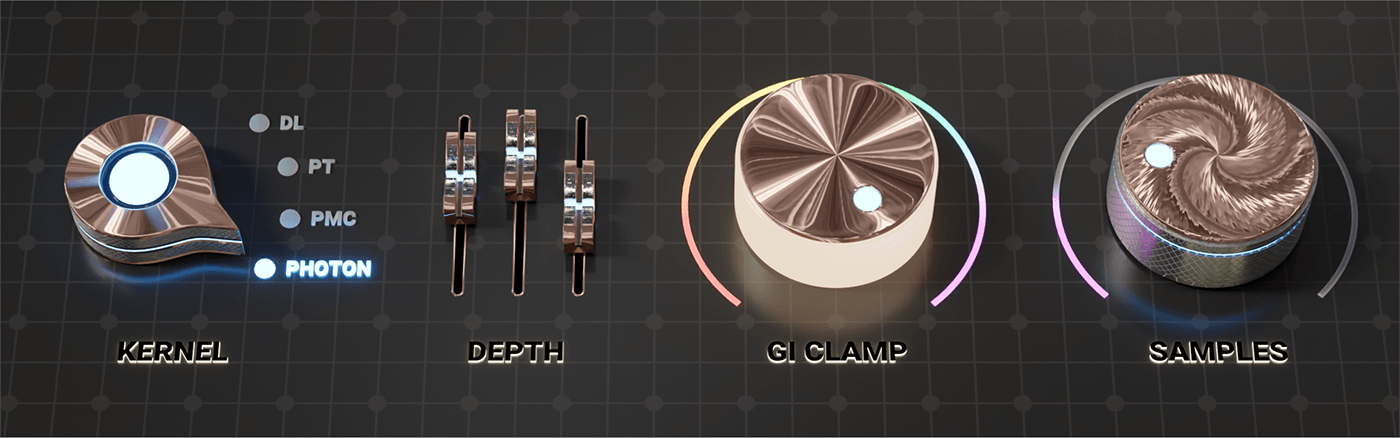
Step 1: The Kernel

The kernel is the main chunk of code that Octane uses to render scenes. It can be selected in the Octane Settings (gear menu, Kernel tab, gray dropdown at the top), or via a dropdown in the Live Viewer that defaults to “DL” in C4D. This is implemented in different locations in different plug-ins and Standalone.
There are currently four of them: Direct Light, Path Tracing, PMC, and Photon Tracing. (There’s an Info Channels kernel too, but that’s for looking at AOVs and other special use things that we’re going to ignore in this guide).
For the most part, the default kernel settings are good as a baseline, and then depending on the scene they can be altered to optimize for the types of lights, materials, and effects we’re after.
Which kernel to pick?

Direct Light (DL)
DL is the oldest and most basic kernel, but is still useful in certain scenes and situations. It has three types of Global Illumination modes which offer different levels of realism and render speed. It doesn’t do caustics, and scattering is very limited, so if we have either of those, we’ll want to move straight to Path Tracing.
Path Tracing (PT)
PT builds on DL by adding better secondary bounce calculations (including caustics) and upping some settings that make most scenes even more realistic than anything DL can achieve. Because of the older methods of calculating secondary bounces, it’s difficult to achieve tight caustic patterns and is very prone to noise and fireflies if the settings aren’t set just so. It’s still a great choice if caustics aren’t an important part of the scene.
Photon Tracing
Photon Tracing builds on Path Tracing by adding a faster, more efficient, and better looking method of calculating caustics. It’s quick and easy to get pretty caustic patterns, plus it has all the same advantages as Path Tracing when it comes to realism. If caustics are important and not resolving well in PT, this is the solution. There’s a whole guide on this topic. One caveat: it creates a bit of overhead and can cause issues in multi-GPU or network rendering setups, so we really should only consider it in cases that have tricky lighting, and/or where caustics is important or causing issues in Path Tracing that can’t be resolved in other ways.
PMC
PMC is kind of the odd kernel out. It can do better caustics than PT (not as good at Photon Tracing), but is FAR slower than the others, and isn’t compatible with Octane’s AI denoiser (2023 and earlier) or adaptive sampling. PMC uses a different algorithm to calculate rays than the other three, and has its own “look” because of this. Occasionally this will be the best path forward if there’s a scene with tons of lights and refractions or from an artistic point of view, but at the expense of waiting a good long time for it to finish. PMC is also not as predictable as PT and Photon Tracing from frame to frame, so it’s not great for animation. As of this writing, Octane 2024 is still in its Alpha stages, but it does support the Intel Open Image Denoiser which is compatible with PMC.
If we’re considering PMC, It may be a smart idea to start the lookdev process in Path Tracing or Photon Tracing, and then move to PMC once we have most of it settled and want to see whether PMC does a better job with our scene (typically only if there’s very complex lighting and refraction).
Step 2: Initial Settings
A good general strategy for setting up the initial settings for any kernel is low samples, high everything else. This reduces the risk of losing important calculations that happen when bounces and clamps are set too low, but also reduces the amount of time our fans are whirring up unnecessarily when we only really need to see a few samples to know whether to change something. Over the course of the optimization process, we’ll be lowering everything else and slowly raising the max samples until we hit a happy medium.
General
AI Light should be on if we’re using physical lights (which need to be set to use primitives or analytic).
Denoiser should be OFF while doing initial lookdev - it can actually slow the render down since it needs time to calculate, and should only be turned on and dialed in toward the end of the process when we’re happy with the overall look and want to see if we can shave a little time off the final frame.
Parallel samples should start at 32. This may have to be lowered if we get tight on VRAM.
Choose tone mapping now. ACES or AgX will give a very different look than standard sRGB (no tonemapping), and will cause us to make different lighting and material color decisions based on what we pick. This is a whole thing in and of itself, and is covered in this guide.
Adaptive Sampling: This should probably always be on. Noise Threshold should be set to 0.02, and Expected Exposure should be set to 0.
Kernel-Specific
Direct Light (DL): 16-64 max samples should suffice, and if we’re using GI_Diffuse, it’s worth moving the Diffuse bounces to 5. For either of the other GI modes, this setting is ignored. If there’s glass or lots of metal, upping the Glossy and Specular bounces to 8 is probably a good idea as well, otherwise the other defaults are good.
Path Tracing (PT) and Photon Tracing: Set max samples Between 64-256 (depending on the GPU and how many easy things vs hard things from above are planned for the scene). The defaults of 16 Diffuse and Specular bounces, and GI Clamp at 1,000,000 is a great place to start. This will be crunchy in some cases or pretty clean in others. We need to make sure that “allow caustics” is on in the IOR channels of our reflective and refractive materials that will create caustics if we’re using Photon Tracing. Caustics is covered in depth in this guide.
PMC: 256-1024 samples, otherwise the defaults are fine. PMC takes longer to resolve detail in caustics, so it needs more samples even during lookdev (which probably should be done in PT or Photon Tracing anyway).
Step 3: Capping the Bounces
All four kernels have three different Depth settings. DL has sliders for Diffuse, Specular, and Glossy. The other three have sliders for Diffuse, Specular, and Scatter. “Depth” refers to the number of times direct rays bounce off or through an object depending on the properties of the material. This is commonly referred to in CG land as “bounces” or “trace depth”.
In the real world, there’s no limit to this - we can stand in a hall of mirrors and see reflections of reflections until they are too small to make out. In our renders, each bounce takes some time to calculate, so if we tried to perfectly mimic reality, we’d be infinitely calculating bounces and die of old age before the render was done.
Optimizing bounces is the easiest way to increase render speed without introducing noise, but it needs to be done thoughtfully. The information created by depth settings can’t be cheated with a post effect, so it’s important to start high to make sure we know what the scene should look like, and then reduce the bounces to increase render time until we hit a point where we start seeing degradation in quality and realism.
Glossy Depth
Glossy Depth is only found in the Direct Light (DL) kernel. The other kernels calculate reflection rays using Specular depth. Glossy affects bounces off of reflective materials that have Specular or Metallic contribution. It has no effect on transmissive (glass/liquids/etc.) materials.
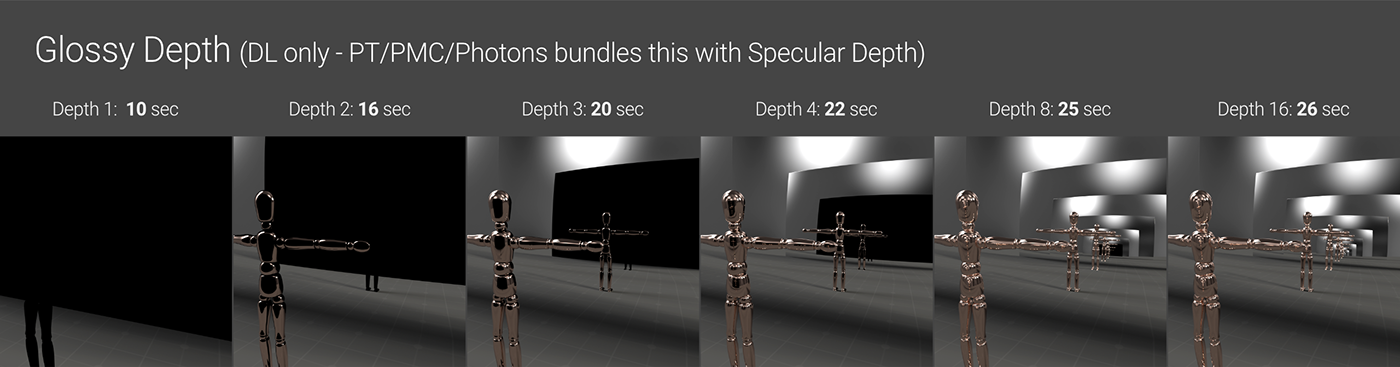
The easiest way to visualize this is with a hall of mirrors setup like in the illustration above. When we run out of bounces, whatever would be reflected again shows as black. We need at least two bounces to see anything reflective. At lower values, we quickly end up with blacked out patches, but at higher ones, the patches become so small they don’t register (just like in real life). 16 is usually plenty for most scenes unless the whole thing is made up of objects that keep reflecting each other.
The DL kernel defaults to 2, which is probably too low for any scene with metals or glossy materials - we’ll probably want to up it to at least 5, if not 8, and then back it down to get the look we’re after.

Specular Depth is found in all kernels. In DL, it only affects transmissive materials (glass, liquids, etc). In the other kernels it affects both reflective (glossy/metallic) and transmissive materials.
Because of the way refraction works, we need at least 3 bounces (default for DL in C4D) to see anything in a transmissive material, which is ok for very simple scenes, but odds are good we’ll need to go higher to prevent blacked out areas. 5 would be a good place to start for a standard scene, or 8 if we have a lot of refraction.
16 (default for the other kernels) is a good sweet spot for most scenes using PT/PMC/Photon Tracing because this setting also affects reflective materials, but if there’s a lot of overlapping glass and metals, it’s possible we’d have to go as high as 32 to resolve some tricky areas if they’re bothering us. Lots of refraction is hard on the GPU and can really impact the render times, so we’ll want to spend a little time optimizing this setting and making sure each bounce counts.
Diffuse Depth
Diffuse Depth is found in all four kernels. This is the number of times rays bounce off materials that have some sort of Diffuse (or Albedo, or Base Layer Color) contribution. These are things like wood, clay, brick, plaster, or anything else that tends to be matte in appearance. Diffuse depth is a little more complicated than Glossy or Specular because it has a lot more to do with indirect rays (secondary bounces) than direct ones.

Unlike the mirror or refraction examples in the other sections, we’re never going to run into an issue where parts of the render are fully blacked out because there aren’t enough primary diffuse rays. What we DO see is our diffuse geometry brightening and softening more as we increase the slider, and that’s because more light is bouncing off the diffuse objects. The brightness of the material plays a large role in how much the light will bounce - the darker the Albedo/Diffuse color, the more it will absorb light and the less impact this setting will have.
This is where it gets a little confusing.
Path Tracing, PMC, and Photon Tracing all use this setting in the same way - the higher the number, essentially the more paths are calculated and the more evenly and naturally lit it looks. All three of these kernels default to 16 which is a good compromise between quality and speed. For some scenes, it might look better when higher and be worth the speed hit, and for others we can reduce it and save some render time.
The Direct Light kernel also has this setting, but whether or not it does anything depends on the GI mode.
DL has three GI modes: Ambient Occlusion (default), None, and Diffuse. GI_None means there are no secondary diffuse bounces, and GI_Ambient Occlusion uses AO and the environment to sort of “fake” indirect lighting without considering secondary diffuse bounces. The Diffuse Depth slider doesn’t do anything in these modes.
GI_Diffuse does what GI_Ambient Occlusion does, but also factors in primary diffuse bounces, so the Diffuse Depth slider does become relevant and affects the scene similarly to the other three kernels.
Octane (in C4D) defaults to 2 diffuse bounces with Direct Lighting, but tops out at 8, which may not be enough. The other three kernels default to 16 bounces which is pretty high, and top out at 1024 bounces, which is ridiculously high, but since this does affect the look of the render, it’s actually better to overestimate first and then dial it back down once the scene is closer to completion and see if it impacts the render time too much.
Scenes where we’ll see the biggest difference with Diffuse Depth are ones that have either a lot of objects with diffuse materials that are pretty close together and have bright materials (like leaves or sand particles), a matte object with complicated geometry with tons of nooks and crannies for light to bounce around inside of, or materials with a scattering medium that uses Diffuse Transmission.
Roughness is also affected by Diffuse depth, so even if the scene has no diffuse materials at all, if it has any reflective/refractive materials with Roughness, we’ll need to make sure we have enough diffuse bounces.
Scatter Depth
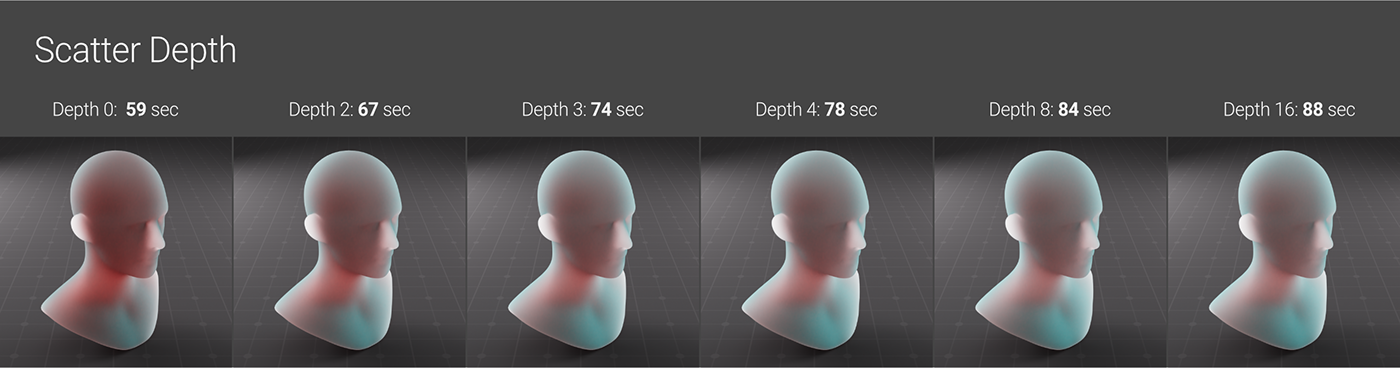
Scatter depth is found in the PT, PMC, and Photon Tracing kernels. Some types of scattering (diffuse transmission-based) actually ARE possible with the Direct Lighting kernel (GI_DIFFUSE mode only, and Diffuse Depth controls the look). Because DL doesn’t have a scatter depth setting, it’s often better to use one of the other kernels for SSS/fog/etc.
Scatter Depth controls the amount of bounces that occur in a scattering medium. It’s only one part of the equation though - getting SSS, fog, and volumes looking good is a delicate dance between Scatter Depth, Max Samples, Medium Density, Volume Step Length, scene lighting, and at least three or four other things. This guide has quite a bit more detail on this.
The difference can be massive or minor depending on all of the other factors. In the example above, the difference between 0, 2, and 3 bounces is pretty apparent, but between 3 and 16 bounces is fairly minor (still there though), and it adds 14 seconds to the render. Depending on how many frames there are, that can add up.
GI Clamp
This setting is a notorious hot button issue, so we’re going to spend a bit of time breaking it down.

Path Tracing, Photon Tracing, and PMC all use a different, more realistic type of indirect lighting than DL. The rays that these other three produce take into account caustics, which is the effect of light bouncing off a reflective surface, or through a refractive one, and settling on a diffuse surface.
Caustics and secondary bounce calculations are hard on the GPU, but they also add a ton of realism to the scene. In the real world, there are unlimited secondary light bounces that go everywhere and illuminate the environment. In a render engine, we have limited resources, so if we try to simulate that and don’t give the simulation enough time to resolve, we get artifacts. These manifest visually as noise and hot pixels (sometimes called ‘fireflies’).
GI clamp is one of the tools that helps mitigate these artifacts. It compresses the contribution of indirect rays. GI clamp acts like a filter to limit really strong, independent rays that end up creating the hotspots earlier on in the progressive sampling process. Limiting the rays limits the realism of the scene (sometimes a little, sometimes a lot), but cleans up hot pixels and caustics-related noise in the Path Tracing and PMC kernels.
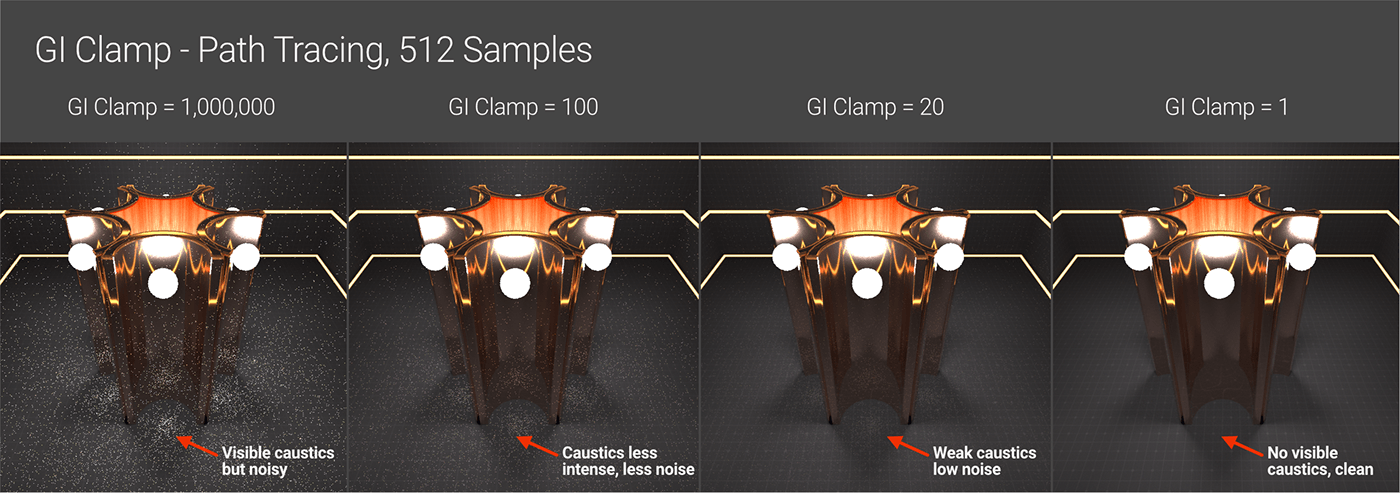
GI Clamp defaults to 1,000,000 which is pretty much unlimited for all intents and purposes. If we set the GI clamp to 1, the result looks very similar (and sometimes exactly the same) as Direct Lighting with GI_Diffuse. For scenes without much in the way of interior lighting or caustics, we can actually get away with very low values like 100 or even 10. Just like the rest of the clamps and caps, we’ll want to start high and work our way down until we hit the balance between speed and quality.
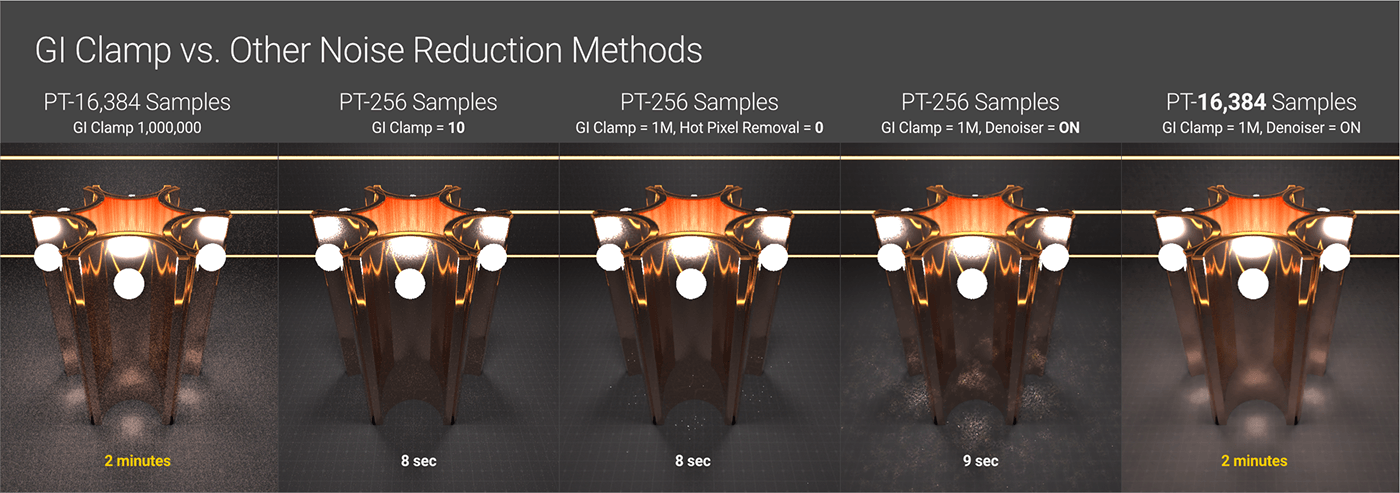
Increasing the Max Samples will resolve some of the noise by brute force iterating on the rays, but usually not enough to get a clean result. Denoiser in the AI Denoiser tab and the Hot pixel removal tool in the Imager tab are both post effects that can help reduce hot pixels. We can’t rely too heavily on them (especially with an animated piece) because they can only use the information they’re given and guess at what they’re supposed to do, so they can leave other artifacts behind like blurry/splotchy areas or removing/altering areas we didn’t want altered.
Ideally we want the GI clamp to remain as high as possible. If our noise and hot pixels are caused by caustics, switching to the Photon Tracing engine should resolve most of that. If the problem is our lights, we can use the techniques found in the Lighting and Emission Guide (better placement of lights, limiting the emissive surface through distribution, real world values, etc.) to solve these issues. Once we’ve done all we can using other methods, THEN we can start lowering the GI clamp to fix any stubborn areas that just won’t resolve.
Step 4. Optimizing the Calculations
Now that we’ve set hard limits on how much the rays bounce around, it’s time to take the calculations that we have left and optimize them a bit.
AI Light
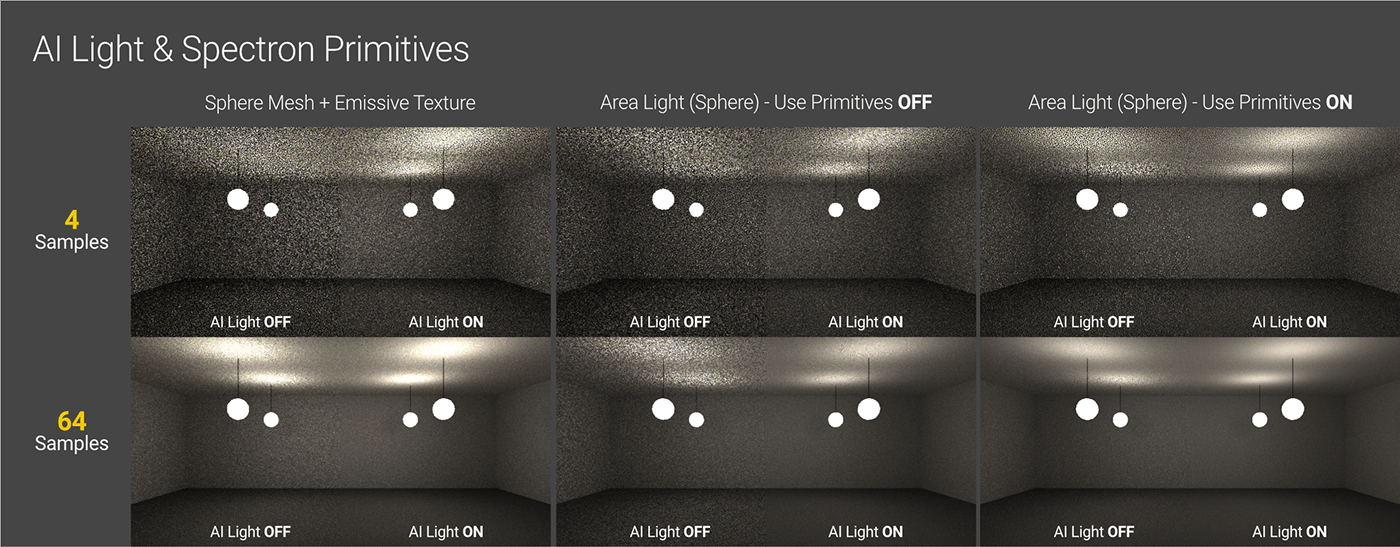
If we have a complex light setup with several area lights in our scene (not HDRIs), this one is a no-brainer. Using AI and Analytic lights can speed the lighting calculations up because they analyze the scene and help put light rays where they’re needed rather than just randomly smatter them. In simpler scenes with a few lights and no tricky bounces, it may not yield any improvements (and in some cases may actually increase render time because of the overhead). The Lighting and Emission Guide goes further into detail on this (search for “Primitives” or “Spectron” - it’s toward the end).
Parallel Samples
This is hardware and scene dependent and has to do with optimizing the number of GPU cores being used at once. Higher values can give us a speed boost, but at the cost of more VRAM being used. Most modern cards can handle a value of 32 for scenes that aren’t super memory intensive (which is another good reason to optimize the scene to cut down on VRAM usage before rendering). 16 is a good start for older cards with less VRAM and/or memory-hungry scenes. VRAM info can be found at the readout at the bottom of the Live Viewer.
Tweaky Settings for Specific Issues
Coherent Ratio can speed up a render at the expense of blotchy or noisy areas in the darker portions of the render. It can cause serious issues for animations, so it should always be set to 0 if it’s not a single frame.
Caustic Blur can help reduce noise in caustic patterns which is useful if we’re using Path Tracing and don't care so much about caustic patterns and would rather them just kind of blur out and not look crunchy. If we do care about sharp or defined patterns, we want to be using the Photon Tracing kernel.
As mentioned before, Hot pixel removal in the Imager tab can reduce hot pixels (or fireflies) after the render is complete if that continues to be an issue.
Step 5: Dialing in the Sampling
After we have about as much of the noise and problem areas resolved as we can while maintaining the look we want, we can now go back to the overall sampling of the scene to determine the final quality we’re after. There are no hard and fast rules here - every scene has different lights, materials, effects, frame sizes, and other things that determine the sweet spot for the number of samples needed to get an acceptable result.
Max Samples
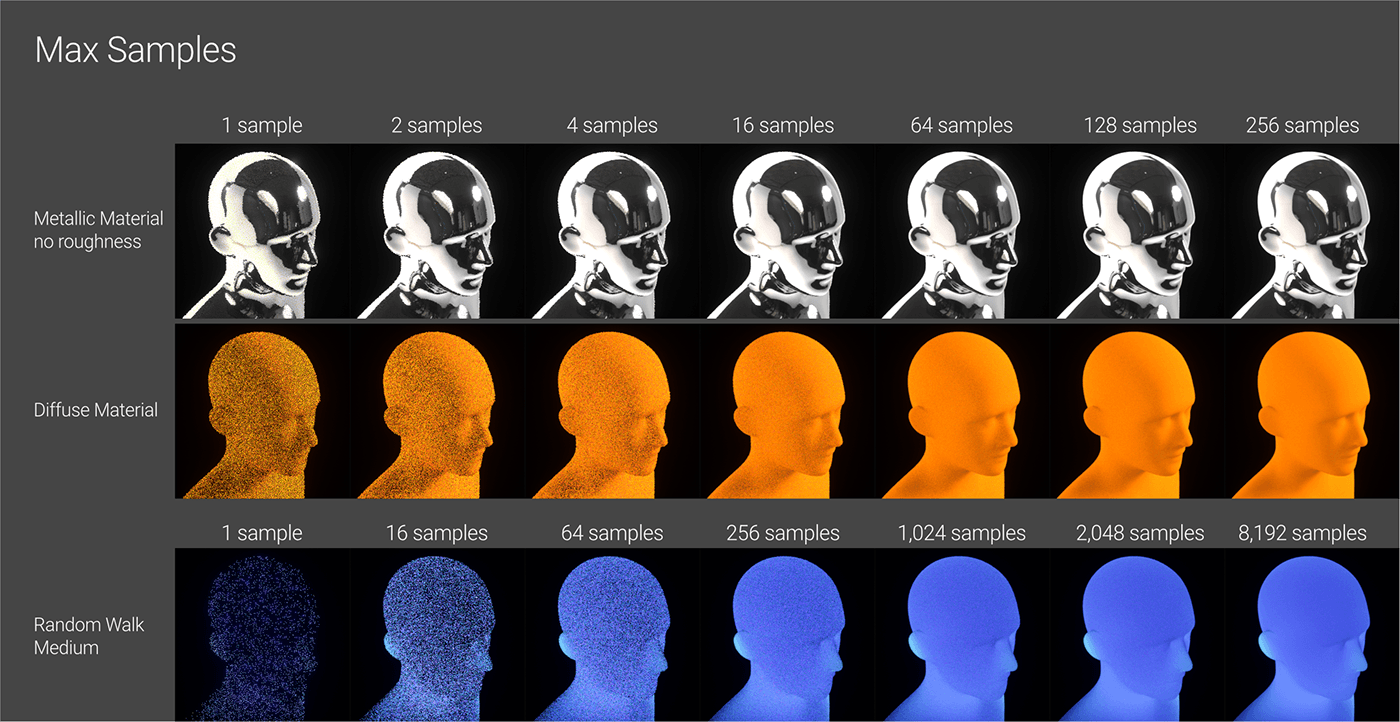
All four kernels in Octane use progressive passes (called samples). This means when we hit render, Octane shoots out a bunch of rays, does some quick and dirty calculations based on light, geo, and materials, and returns a really crunchy, low-fi image so we can at least see something. This is the first pass, or first sample. It then does the same thing again and returns another version that’s slightly better - the second sample. It continues to refine and refine until it hits the maximum number of samples that we set in the Max Samples field.
Direct Lighting often needs FAR fewer samples than the other kernels because it’s not capable of advanced effects like caustics that beat on the GPU and require more time to resolve all the finer details, especially if we’re using GI_AO or GI_None. That’s why the default for that kernel (in C4D) is 128. That said, we can still cause it grief by throwing something like Random Walk SSS at it (see the # of samples required above).
The other three kernels do have to deal with caustics and real secondary bounces, and since Octane doesn’t know exactly what we’re doing, it sets the default to 16,000 max samples (C4D does, at any rate - YMMV with Standalone and the other plugins, but it’s typically pretty high). This usually is enough to resolve nearly anything (eventually), regardless of how much we fail to optimize the other settings.
16,000 samples takes a long time, and on simple scenes that resolve quickly, it’s wasted work because the incremental differences between samples aren’t worth the extra render time. Regardless of the kernel, or makeup of the scene, the strategy is to get close to the fewest samples possible while still producing the quality we need. It’s “get close to” and not “find exactly” because we can waste a ton of time doing A/B testing between small increments (does 1020 samples or 1040 samples look better? Does it matter?) that we could have better used to improve other parts of the render, or spend more time with our families.
Adaptive Sampling
Max samples can be thought of as a brute force way of reducing noise. Adaptive Sampling optimizes this by stopping sampling from happening in the parts of the render that it sees as fully resolved and then turns the firehose on the more difficult areas that are still noisy. By focusing efforts on the areas of the render that need it most, this can greatly speed things up.
Important: PMC does not support Adaptive Sampling, but the other three kernels do.
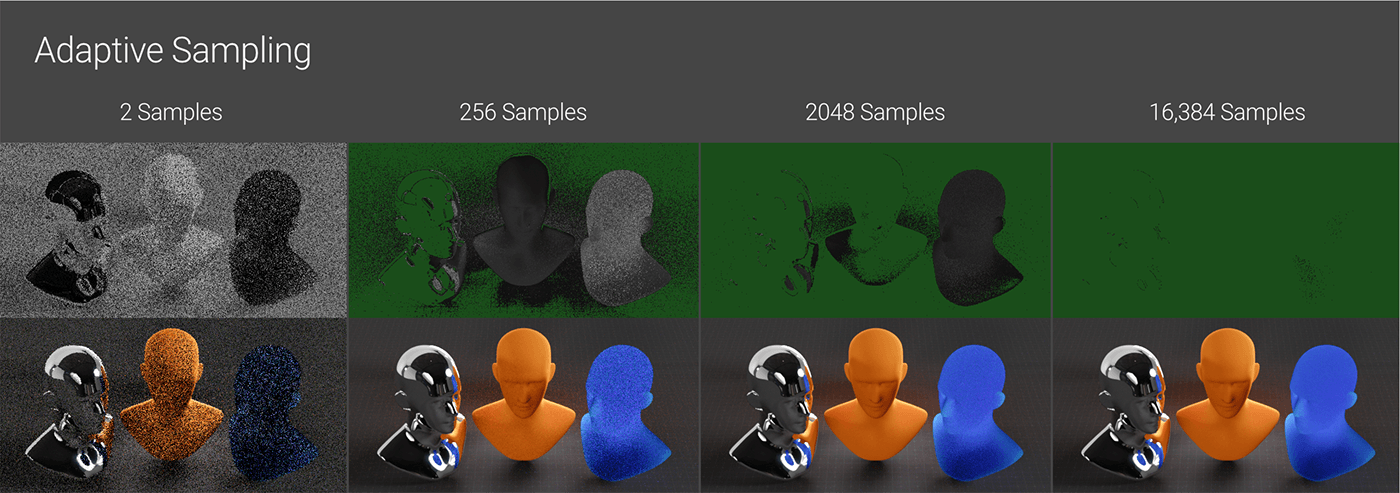
Scenes that have a lot of noise issues in particular areas may see a pretty large speed increase in overall render time. Ones that have a pretty even amount of difficulty across the frame may not be affected at all. The scene in the illustration above is a great candidate for Adaptive Sampling.
The top row shows the noise over time - the portions that light up green are fully resolved and no more attention is given to them. The metal on the left took almost no time to render, the diffuse material in the middle needed about 1000 samples, and the SSS on the right was extremely hard on the GPU and needed the full 16k samples to clean up.
The whole scene still took 16,384 samples to fully resolve both with and without Adaptive Sampling, but with it on, it took 1:07, vs. 3:30 with it off because toward the end, Octane only had to worry about the SSS head, so it was able to burn through those remaining samples much faster.
The noise threshold controls the speed-to-quality ratio. 0.02 gives a clean result and most of the time doesn’t come with enough of a speed hit to worry about. 0.03 (default) is a little faster, but a little noisier. 0.04+ is noisier still, but may be considerably faster if we’re after speed over quality during the lookdev phase.
Minimum samples is, as it sounds, the minimum amount of samples put into any area before it’s marked as resolved. Most of the time the default of 256 is fine for any scene complex enough to benefit from Adaptive Sampling. If we know for sure we have scenes with super easy portions (clean metal only reflecting an HDRI background, for example), or if we have a mostly easy scene with one small problematic area, we can try reducing this for a little bit of a speed boost, or if we have problematic scenes that don’t resolve, we can try increasing it.
Pixel grouping bundles pixels in the final image together - whether or not this makes a difference depends on the makeup of the scene. In the example above (1280x640), setting this to 4x4 finished in 1:20, 2x2 (default) finished in 1:13, and none finished in 1:07. The odds of getting artifacts goes up as the grouping decreases, but it lowers the time it takes to resolve and boosts the speed a little. 2x2 is usually a good tradeoff.
Expected exposure should be set to 0 (or effectively off) when we first start. This will give us a cleaner render at the cost of a little speed. If the lighting in the scene isn’t terribly tricky (reasonably flat), we can try setting it back to 1 to see if the speed/noise trade off is worth it. If we messed with the Exposure setting in the Imager, then this should be set to the same value as Exposure to work properly.
AI Denoiser
Once we’ve got everything else settled, we can look into whether we can get away with denoising to help the render times. Denoising is a post effect in the Imager tab of the Octane Settings that waits until the render is done and then does some magic algorithm stuff to analyze portions of the image and remove what it considers “noise”.
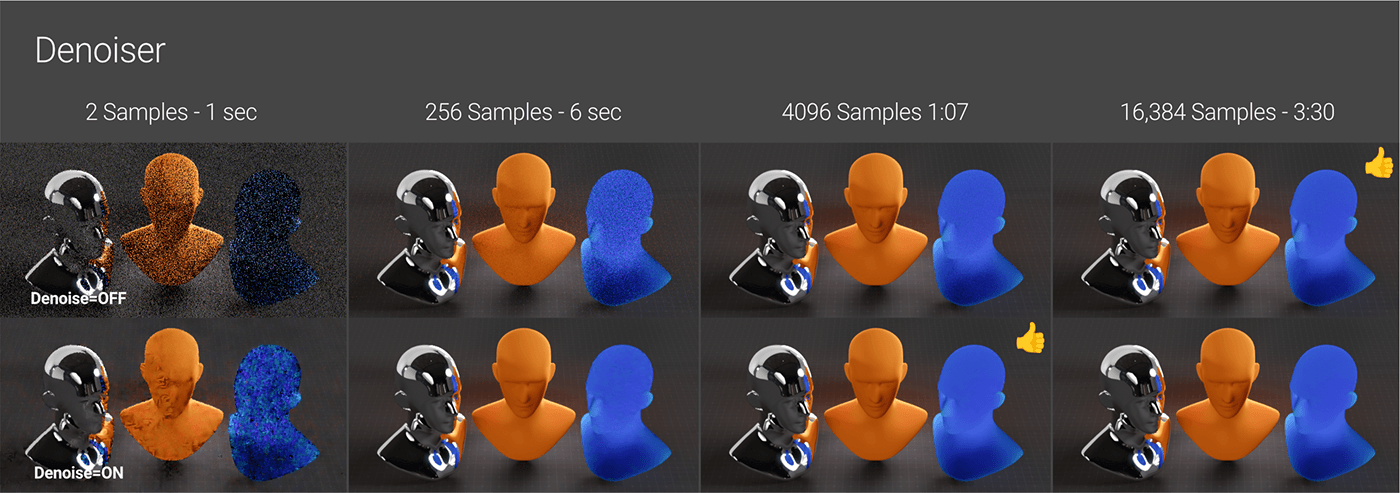
What this allows us to do is stop the render earlier and cheat our way to the final product. In the example above, we can see that even at 2 samples, Denoiser does a bang up job on the metal (since it was mostly there anyway), a poor job on the diffuse material, and an abysmal job on the SSS because, to be fair, it really didn’t have much to work with. By 256 samples (6 sec), the metal and diffuse are pretty much there, and the SSS is getting there. Somewhere between 3072 (50 sec) and 4096 (1:07), we can stop the render and call the denoised version final. Without, the SSS still has a bunch of noise that only goes away after 16k samples and another 2+ minutes.
Sometimes, in the case of large flat, smooth, organic areas, this can mean we only need a fraction of the samples to get a clean render. In other cases, it could mean all the intricate patterns we spent so much time on get wiped out or blotchy because the denoiser thought they were noise, and we only shave off a few seconds by the time we get enough samples that it looks ok. This is entirely scene-dependent.
A good rule of thumb is to get the render as close to clean as possible WITHOUT denoiser, and then apply the denoiser and incrementally reduce the max samples to see how low we can go while still maintaining the integrity of the render. This may mean reducing the min samples and noise threshold if we’re combining this with adaptive sampling.
There are also a few denoiser settings like min samples and interval that affect how often the denoiser is applied throughout the sampling process (so we can see it re-denoise every x samples). These settings only apply if “denoise on completion” is turned off. Turning it off can cause things to slow down depending on the scene and hardware, so usually it’s advisable to just wait until the render is complete unless we’re trying to ballpark how few samples we can get away and still get a decent denoised result.
Important: Denoising can have undesired effects like jitter or moving blobs in an animation if we lean too heavily on it. It’s always a good idea to render out either a smaller set of frames or a render region for an animation to make sure we don’t waste time on 900 frames that end up being unusable.
Tone Mapping

While Tone Mapping isn’t really an “optimization” thing per se, it still affects how we set up our lights and materials, and if we’re using the default un-tonemapped method, it may lead us to make certain decisions which can cause problems with other parts of the render.
Except for a few very specific cases (we need to match an sRGB hex value EXACTLY, for instance, or we’re going for a very particular non-photoreal style), the default method of tone mapping (which is basically just clipping out-of-gamut values) is never as good as an alternative type like ACES or AgX.
Fortunately Octane has a one-click solution to allow us to use ACES tone mapping, and while it takes a little doing to set up OCIO to use AgX, once we get it going, it’s easy to implement for all our projects.
Tone mapping and color spaces in general is a tricky topic to fully understand. There’s a whole guide on the hows and whys of color management in general, and another one that shows how it applies to Octane.
Author Notes
Version 1.0, Updated Feb 2023 using Octane 2023.1.2 and Cinema 4D 2024.2 with help from Marcus Spranger & Roeland Schoukens @Otoy (thank you!!)
Changes from 1.0: Full rewrite to get up to date with the Photon Tracing kernel and newer methods and information.
This guide originally appeared on https://be.net/scottbenson and https://help.otoy.com/hc/en-us/articles/212549326-OctaneRender-for-CINEMA-4D-Cheatsheet
All rights reserved.
The written guide may be distributed freely and can be used for personal or professional training, but not modified or sold. The assets distributed within this guide are either generated specifically for this guide and released as cc0, or sourced from cc0 sites, so they may be used for any reason, personal or commercial.


